Yes, ok, my latest obsession of writing #Reconfigure might make a greta TV series or Movie but that’s not what this is about. Instead it is about another set of skills I seem to be putting into practice.
Before the I spent a day editing up the school end of year video. I didn’t shoot it, but I did use al the various messing around and comedy moments from the teachers and staff to put a montage together. It had a story, some pace, a step change or two. It was great fun. I have now been asked to edit a few more things together. I like editing moving images, it is fun. Though I am not charging for this is just to help people out.
At the same time I am in the middle of a little project to try and jazz up a regular presentation in the corporate space. I demoed a little virtual fly through a building, past a couple of characters and onto an image using Unity3d. It turned into a slightly more complex epic but non the less I am using lots of varied skills to make it work. The pitch will be pre canned but I have built the Unity environment so that it runs on rails, but live. I have c# code in there to help do certain things like play video textures, animation controllers and even NavMesh agents to allow a character to walk around to a particular room and lots of flying cameras. I had used the first few things a lot. It is stock Unity. However I had not really had a chance to use Unity animations. All my animations had been either remade FBX files or ones that I created in Cheetah3D. Once you imported an animation like that it was then sort of locked in place.
However, Unity3d has its own animation dope and curve sheets, and its really handy.
The animation Tab brings a different timeline. It is different to the Animation Controller screen that lets you string animation together and create transitions. e.g. jump or run from a walk.
The animation tab lets you select an object in the scene and create a .anim for you. It then by default adds that anim to an animation controller and adds that to the object.
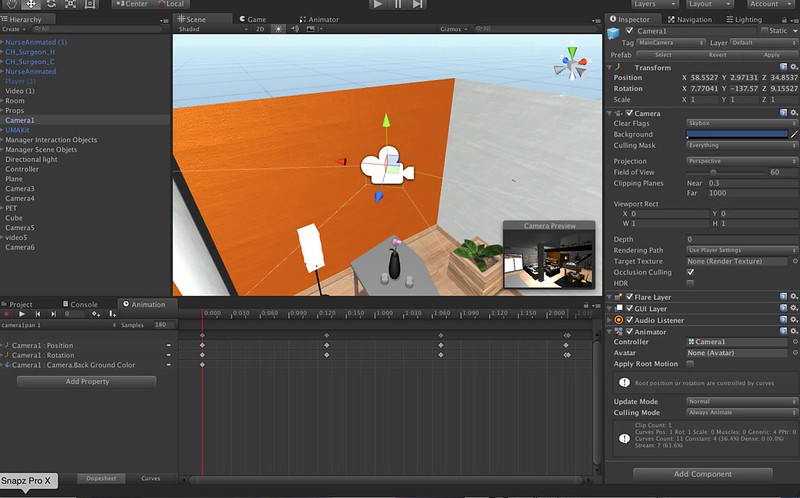
The record mode then allows you to expand any or all of the properties of the object, usually transform position and rotation, but it can be colour, visibility, basically anything with a parameter. If you move the timeline and then move the object, like a camera for instance, it creates the key frames for the changed parameters. It removes any of the awkward importing of paths and animation ideas from another tool. It is not great for figures and people. They are still best imported as skinned meshes with skeletons and let the import deal with all the complexity so you can add any stock animations to them. Whoever for a cut scene, or zoom past to see a screen on a wall it works really well.
I have written a lot of complicated things in Unity3d, but never bothered using this part. It is great to find it working, and doing exactly what I needed it to do for my cinematic cut scenes.
You can have things zooming and spinning around a known path in no time. You have to break it down a little otherwise it resolves the easiest path through a wall or something, but it seems very robust to edit it afterwards.
The only pity is that its not possible to lock a camera preview window open in stock Unity3d when selecting another object. Having got a camera pan just right its trick if you was to move an object in the camera view. With camera selected you see it’s preview, with the object selected you see it. Never got around that yet, just end up with trial and error.
No matter, it works, and its awesomely useful.
Leave a Reply